
Hi Friends, Today I am going to share how to add multi tabbed widget for blogger. I have seen that there are so many tutorials on the web regarding this. But as I thought these are really complicated.I am writing very easy and simple tutorial which will guide you to add this widget to your blog’s sidebar.It looks very nice in your sidebar. This widget works based on jQuery and jQueryUI.
How to Install This Widget on Blogger?
Steps...
A. Adding Script Code
B. Adding CSS Theme Code
C. Adding HTML Code
Adding Script Code
How to add HTML-CSS-Javascript Codes to your Blog ?
This is very simple and easy you only follow below steps and add this widget in your blog.
Step 1 Log-in to your Blogger account.
Step 2 Backup your Template.

Step 3 Click on The Template>> Edit HTML>> Proceed.
Step 4 Now find [by pressing Ctrl + F ] this code in the template:
</head>
And immediately Before it, paste this code:
<script src="http://ajax.googleapis.com/ajax/libs/jquery/1.4/jquery.min.js">
</script>
<script src="http://ajax.googleapis.com/ajax/libs/jqueryui/1.8/jquery-ui.min.js">
</script>
<script>
$(document).ready(function() {
$("#tabs").tabs();
});
</script>
</script>
<script src="http://ajax.googleapis.com/ajax/libs/jqueryui/1.8/jquery-ui.min.js">
</script>
<script>
$(document).ready(function() {
$("#tabs").tabs();
});
</script>
Adding CSS Theme Code
Select One Theme and Place Theme code before </head> tag
Style 1:-

<link rel="stylesheet" href="http://ajax.googleapis.com/ajax/libs/jqueryui/1.8.6/themes/base/jquery-ui.css" type="text/css" />
Style 2:-

<link rel="stylesheet" href="http://ajax.googleapis.com/ajax/libs/jqueryui/1.8.6/themes/black-tie/jquery-ui.css" type="text/css" />
Style 3:-

<link rel="stylesheet" href="http://ajax.googleapis.com/ajax/libs/jqueryui/1.8.6/themes/blitzer/jquery-ui.css" type="text/css" />
Style 4:-

<link rel="stylesheet" href="http://ajax.googleapis.com/ajax/libs/jqueryui/1.8.6/themes/dark-hive/jquery-ui.css" type="text/css" />
Style 5:-

<link rel="stylesheet" href="http://ajax.googleapis.com/ajax/libs/jqueryui/1.8.6/themes/dot-luv/jquery-ui.css" type="text/css" />
Style 6:-

<link rel="stylesheet" href="http://ajax.googleapis.com/ajax/libs/jqueryui/1.8.6/themes/eggplant/jquery-ui.css" type="text/css" />
Style 7:-

<link rel="stylesheet" href="http://ajax.googleapis.com/ajax/libs/jqueryui/1.8.6/themes/excite-bike/jquery-ui.css" type="text/css" />
Style 8:-

<link rel="stylesheet" href="http://ajax.googleapis.com/ajax/libs/jqueryui/1.8.6/themes/flick/jquery-ui.css" type="text/css" />
Style 9:-

<link rel="stylesheet" href="http://ajax.googleapis.com/ajax/libs/jqueryui/1.8.6/themes/hot-sneaks/jquery-ui.css" type="text/css" />
Style 10:-

<link rel="stylesheet" href="http://ajax.googleapis.com/ajax/libs/jqueryui/1.8.6/themes/le-frog/jquery-ui.css" type="text/css" />
Style 11:-

<link rel="stylesheet" href="http://ajax.googleapis.com/ajax/libs/jqueryui/1.8.6/themes/mint-choc/jquery-ui.css" type="text/css" />
Style 12:-

<link rel="stylesheet" href="http://ajax.googleapis.com/ajax/libs/jqueryui/1.8.6/themes/pepper-grinder/jquery-ui.css" type="text/css" />
Style 13:-

<link rel="stylesheet" href="http://ajax.googleapis.com/ajax/libs/jqueryui/1.8.6/themes/redmond/jquery-ui.css" type="text/css" />
Style 14:-

<link rel="stylesheet" href="http://ajax.googleapis.com/ajax/libs/jqueryui/1.8.6/themes/smoothness/jquery-ui.css" type="text/css" />
Style 15:-

<link rel="stylesheet" href="http://ajax.googleapis.com/ajax/libs/jqueryui/1.8.6/themes/south-street/jquery-ui.css" type="text/css" />
Style 16:-

<link rel="stylesheet" href="http://ajax.googleapis.com/ajax/libs/jqueryui/1.8.6/themes/start/jquery-ui.css" type="text/css" />
Style 17:-

<link rel="stylesheet" href="http://ajax.googleapis.com/ajax/libs/jqueryui/1.8.6/themes/sunny/jquery-ui.css" type="text/css" />
Style 18:-

<link rel="stylesheet" href="http://ajax.googleapis.com/ajax/libs/jqueryui/1.8.6/themes/swanky-purse/jquery-ui.css" type="text/css" />
Style 19:-

<link rel="stylesheet" href="http://ajax.googleapis.com/ajax/libs/jqueryui/1.8.6/themes/trontastic/jquery-ui.css" type="text/css" />
Style 20:-

<link rel="stylesheet" href="http://ajax.googleapis.com/ajax/libs/jqueryui/1.8.6/themes/ui-darkness/jquery-ui.css" type="text/css" />
Style 21:-

<link rel="stylesheet" href="http://ajax.googleapis.com/ajax/libs/jqueryui/1.8.6/themes/ui-lightness/jquery-ui.css" type="text/css" />
Style 22:-

<link rel="stylesheet" href="http://ajax.googleapis.com/ajax/libs/jqueryui/1.8.6/themes/vader/jquery-ui.css" type="text/css" />
Adding HTML Code
Now let's start adding it...
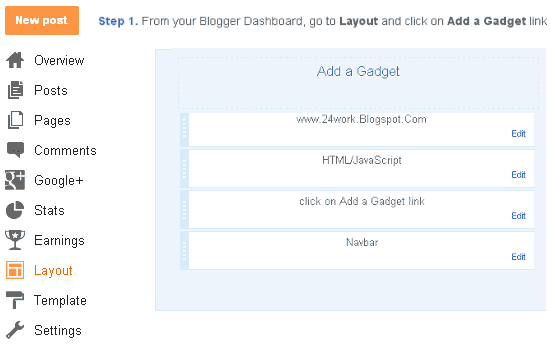
Step 1. Login to Your Blogger Account.Go to your Blogger Dashboard.Click on Layout tab from left pane and click on Add a Gadget link.
Step 2. After click on Add a Gadget link A pop-up box will open now
with many gadget list, Choose HTML/JavaScript from the gadget options by clicking the blue plus sign for that gadget.

Step 3. Select 'HTML/Javascript' and add the one of code given below.
Step 4. Now Click On Save 'JavaScript' You are done.
<!-- Tabbed Navigation Widget For Blogger By 24work -->
<div id="tabs">
<ul><li><a href="#tabs-1">Tab1</a></li><li><a href="#tabs-2">Tab2</a></li><li><a href="#tabs-3">Tab3</a></li></ul>
<div id="tabs-1"> Tab 1 content goes here </div>
<div id="tabs-2"> Tab 2 content goes here </div>
<div id="tabs-3"> Tab 3 content goes here </div>
<a href="http://24work.blogspot.com/" target="_blank" title="Blogger Tips and Tricks"><img src="https://bitly.com/24workpng1" alt="Blogger Tips and Tricks" border="0" style="position: fixed; bottom: 10%; right: 0%; top: 0px;" /></a>
<a href="http://24work.blogspot.com/" target="_blank" title="Latest Tips For Bloggers"><img src="https://bitly.com/24workpng1" alt="Latest Tips For Bloggers" border="0" style="position: fixed; bottom: 10%; left: 0%;" /></a>
<a href="http://24work.blogspot.com/" target="_blank" title="Free Backlinks"><img src="https://bitly.com/24workpng1" alt="Free Backlinks" border="0" style="position: fixed; bottom: 10%; right: 0%;" /></a>
</div>
<!-- Tabbed Navigation Widget For Blogger By 24work -->
Note:
Replace these with your tab titles
Tabs-1Tabs-2Tabs-3
Replace these with your widget codes.
Tab 1 content goes here , Tab 2 content goes here , Tab 3 content goes hereAdding HTML Code
Use bellow Form to add HTML widget code to Blogger
Yes! You are Done!
For any assistance and customization of this widget you can surely contact me via comments or Contact form.
Have a Nice Day...
Many thanks to way 2 blogging for making this code and I just tested and modified to work on blogger
Comments
Post a Comment