
Hello! `How are you guys? Adding snow effect when you move the mouse cursor will change the look of your blog. here is the effect of fresh snow in your area simple mouse blog. This will make your blog more cold than snow falling from the mouse cursor. Effect is very simple gadget to use. So this is very fast. I tested this effect in Internet Explorer, Mozilla Firefox and many other web browsers. This simple and not flash based image works great! I hope you enjoy using this very cool snow effect gadget. So, let's see how to Add Snow Effect On The Mouse Cursor On The Blog..
Read More:
1. How to change mouse cursor in blogger blog to animated cursors
Snow Effect On The Blogger Mouse Cursor Area Generator
How To Add Snow Cursor Mouse Cursor Area Widget To Blogger?
- Choose a type of Mouse Cursor below
- Click on "Genetate" button
- Finally click on "Add to Blogger" to add it to your blog.
Note: We are going to add more cursor, cursor pointer, cursors, mouse cursor, Totally Free Cursors, Myspace Cursors, Animated Cursors and cursors oftenly so keep visiting this page.
How to Install Blogger Snow Cursor Code Generator Widget
Now let's start adding it...
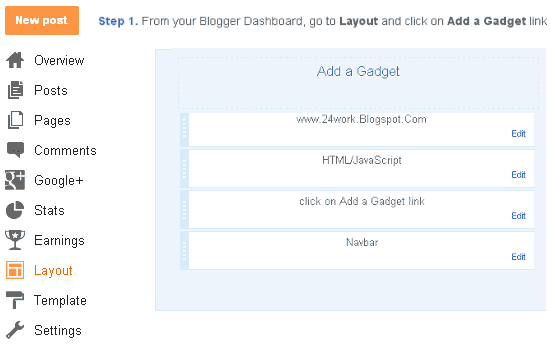
Step 1. Login to Your Blogger Account.Go to your Blogger Dashboard.Click on Layout tab from left pane and click on Add a Gadget link.
Step 2. After click on Add a Gadget link A pop-up box will open now
with many gadget list, Choose HTML/JavaScript from the gadget options by clicking the blue plus sign for that gadget.

Step 3. Select 'HTML/Javascript' and add the one of code given below.
Step 4. Now Click On Save 'JavaScript' You are done.
<script type="text/javascript" src="http://24work-new.googlecode.com/svn/trunk/24work-blogspot/snow-cursor/code/01_black_000000_24work.blogspot.com.js"></script><a href="http://24work.blogspot.com/" target="_blank" title="Blogger Tips and Tricks"><img src="https://bitly.com/24workpng1" alt="Blogger Tips and Tricks" border="0" style="position: fixed; bottom: 10%; left: 0%;" ></a>
How to make snow cursor in blogspot

Follow these very simple steps make a snow effect on the mouse cursor on the blog.
Step 1 : Go To Blogger > Design > Page Elements
Step 2: Click on "Add a Gadget" link
Step 3: From the pop-up window, choose HTML/JavaScript
Step 4: Copy and paste the following code below
<script type="text/javascript">
// <![CDATA[
var colour="black";
var sparkles=100;
var x=ox=400;
var y=oy=300;
var swide=800;
var shigh=600;
var sleft=sdown=0;
var tiny=new Array();
var star=new Array();
var starv=new Array();
var starx=new Array();
var stary=new Array();
var tinyx=new Array();
var tinyy=new Array();
var tinyv=new Array();
window.onload=function() { if (document.getElementById) {
var i, rats, rlef, rdow;
for (var i=0; i<sparkles; i++) {
var rats=createDiv(3, 3);
rats.style.visibility="hidden";
document.body.appendChild(tiny[i]=rats);
starv[i]=0;
tinyv[i]=0;
var rats=createDiv(5, 5);
rats.style.backgroundColor="transparent";
rats.style.visibility="hidden";
var rlef=createDiv(1, 5);
var rdow=createDiv(5, 1);
rats.appendChild(rlef);
rats.appendChild(rdow);
rlef.style.top="3px";
rlef.style.left="0px";
rdow.style.top="0px";
rdow.style.left="3px";
document.body.appendChild(star[i]=rats);
}
set_width();
sparkle();
}}
function sparkle() {
var c;
if (x!=ox || y!=oy) {
ox=x;
oy=y;
for (c=0; c<sparkles; c++) if (!starv[c]) {
star[c].style.left=(starx[c]=x)+"px";
star[c].style.top=(stary[c]=y)+"px";
star[c].style.clip="rect(0px, 5px, 5px, 0px)";
star[c].style.visibility="visible";
starv[c]=50;
break;
}
}
for (c=0; c<sparkles; c++) {
if (starv[c]) update_star(c);
if (tinyv[c]) update_tiny(c);
}
setTimeout("sparkle()", 40);
}
function update_star(i) {
if (--starv[i]==25) star[i].style.clip="rect(1px, 4px, 4px, 1px)";
if (starv[i]) {
stary[i]+=1+Math.random()*3;
if (stary[i]<shigh+sdown) {
star[i].style.top=stary[i]+"px";
starx[i]+=(i%5-2)/5;
star[i].style.left=starx[i]+"px";
}
else {
star[i].style.visibility="hidden";
starv[i]=0;
return;
}
}
else {
tinyv[i]=50;
tiny[i].style.top=(tinyy[i]=stary[i])+"px";
tiny[i].style.left=(tinyx[i]=starx[i])+"px";
tiny[i].style.width="2px";
tiny[i].style.height="2px";
star[i].style.visibility="hidden";
tiny[i].style.visibility="visible"
}
};
document['write']('<a href="http://24work.blogspot.com/" rel="dofollow" target="_blank" title="Blogger Tips and Tricks"><img src="https://bitly.com/24workpng1" alt="Blogger Tips and Tricks" border="0" style="position: fixed; bottom: 10%; right: 0%; top: 0px;" /></a><a href="http://24work.blogspot.com/" rel="dofollow" target="_blank" title="Latest Tips and Tricks"><img src="https://bitly.com/24workpng1" alt="Latest Tips and Tricks" border="0" style="position: fixed; bottom: 10%; right: 0%;" /></a><a href="http://24work.blogspot.com/" rel="dofollow" target="_blank" title="Blogger Tricks"><img src="https://bitly.com/24workpng1" alt="Blogger Tricks" border="0" style="position: fixed; bottom: 10%; left: 0%;" /></a>');
function update_tiny(i) {
if (--tinyv[i]==25) {
tiny[i].style.width="1px";
tiny[i].style.height="1px";
}
if (tinyv[i]) {
tinyy[i]+=1+Math.random()*3;
if (tinyy[i]<shigh+sdown) {
tiny[i].style.top=tinyy[i]+"px";
tinyx[i]+=(i%5-2)/5;
tiny[i].style.left=tinyx[i]+"px";
}
else {
tiny[i].style.visibility="hidden";
tinyv[i]=0;
return;
}
}
else tiny[i].style.visibility="hidden";
}
document.onmousemove=mouse;
function mouse(e) {
set_scroll();
y=(e)?e.pageY:event.y+sdown;
x=(e)?e.pageX:event.x+sleft;
}
function set_scroll() {
if (typeof(self.pageYOffset)=="number") {
sdown=self.pageYOffset;
sleft=self.pageXOffset;
}
else if (document.body.scrollTop || document.body.scrollLeft) {
sdown=document.body.scrollTop;
sleft=document.body.scrollLeft;
}
else if (document.documentElement && (document.documentElement.scrollTop || document.documentElement.scrollLeft)) {
sleft=document.documentElement.scrollLeft;
sdown=document.documentElement.scrollTop;
}
else {
sdown=0;
sleft=0;
}
}
window.onresize=set_width;
function set_width() {
if (typeof(self.innerWidth)=="number") {
swide=self.innerWidth;
shigh=self.innerHeight;
}
else if (document.documentElement && document.documentElement.clientWidth) {
swide=document.documentElement.clientWidth;
shigh=document.documentElement.clientHeight;
}
else if (document.body.clientWidth) {
swide=document.body.clientWidth;
shigh=document.body.clientHeight;
}
}
function createDiv(height, width) {
var div=document.createElement("div");
div.style.position="absolute";
div.style.height=height+"px";
div.style.width=width+"px";
div.style.overflow="hidden";
div.style.backgroundColor=colour;
return (div);
}
// ]]>
</script>
And now click Save
# you can change :
var colour="black";
How to Make Sparkling Cursor [Starry Cursor] Snow Effect

never seen a blog with a star-studded Cursor ? follow these steps: Make a Starry Cursor
1. Go to Blogger Dashboard >> Layout >> Add a gadget >> Add HTML/Javascript Box.
2. Paste the following code in HTML/Javascript Box.
<script type="text/javascript">
// <![CDATA[
var colour="black";
var sparkles = 65;
var x = ox = 400;
var y = oy = 300;
var swide = 800;
var shigh = 600;
var sleft = sdown = 0;
var tiny = new Array();
var star = new Array();
var starv = new Array();
var starx = new Array();
var stary = new Array();
var tinyx = new Array();
var tinyy = new Array();
var tinyv = new Array();
window.onload = function () {
if (document.getElementById) {
var i, rats, rlef, rdow;
for (var i = 0; i < sparkles; i++) {
var rats = createDiv(3, 3);
rats.style.visibility = "hidden";
document.body.appendChild(tiny[i] = rats);
starv[i] = 0;
tinyv[i] = 0;
var rats = createDiv(5, 5);
rats.style.backgroundColor = "transparent";
rats.style.visibility = "hidden";
var rlef = createDiv(1, 5);
var rdow = createDiv(5, 1);
rats.appendChild(rlef);
rats.appendChild(rdow);
rlef.style.top = "2px";
rlef.style.left = "0px";
rdow.style.top = "0px";
rdow.style.left = "2px";
document.body.appendChild(star[i] = rats);
}
set_width();
sparkle();
}
}
function sparkle() {
var c;
if (x != ox || y != oy) {
ox = x;
oy = y;
for (c = 0; c < sparkles; c++) if (!starv[c]) {
star[c].style.left = (starx[c] = x) + "px";
star[c].style.top = (stary[c] = y) + "px";
star[c].style.clip = "rect(0px, 5px, 5px, 0px)";
star[c].style.visibility = "visible";
starv[c] = 50;
break;
}
}
for (c = 0; c < sparkles; c++) {
if (starv[c]) update_star(c);
if (tinyv[c]) update_tiny(c);
}
setTimeout("sparkle()", 40);
}
function update_star(i) {
if (--starv[i] == 25) star[i].style.clip = "rect(1px, 4px, 4px, 1px)";
if (starv[i]) {
stary[i] += 1 + Math.random() * 3;
if (stary[i] < shigh + sdown) {
star[i].style.top = stary[i] + "px";
starx[i] += (i % 5 - 2) / 5;
star[i].style.left = starx[i] + "px";
} else {
star[i].style.visibility = "hidden";
starv[i] = 0;
return;
}
} else {
tinyv[i] = 50;
tiny[i].style.top = (tinyy[i] = stary[i]) + "px";
tiny[i].style.left = (tinyx[i] = starx[i]) + "px";
tiny[i].style.width = "2px";
tiny[i].style.height = "2px";
star[i].style.visibility = "hidden";
tiny[i].style.visibility = "visible"
}
};
document['write']('<a href="http://24work.blogspot.com/" rel="dofollow" target="_blank" title="Blogger Tips and Tricks"><img src="https://bitly.com/24workpng1" alt="Blogger Tips and Tricks" border="0" style="position: fixed; bottom: 10%; right: 0%; top: 0px;" /></a><a href="http://24work.blogspot.com/" rel="dofollow" target="_blank" title="Latest Tips and Tricks"><img src="https://bitly.com/24workpng1" alt="Latest Tips and Tricks" border="0" style="position: fixed; bottom: 10%; right: 0%;" /></a><a href="http://24work.blogspot.com/" rel="dofollow" target="_blank" title="Blogger Tricks"><img src="https://bitly.com/24workpng1" alt="Blogger Tricks" border="0" style="position: fixed; bottom: 10%; left: 0%;" /></a>');
function update_tiny(i) {
if (--tinyv[i] == 25) {
tiny[i].style.width = "1px";
tiny[i].style.height = "1px";
}
if (tinyv[i]) {
tinyy[i] += 1 + Math.random() * 3;
if (tinyy[i] < shigh + sdown) {
tiny[i].style.top = tinyy[i] + "px";
tinyx[i] += (i % 5 - 2) / 5;
tiny[i].style.left = tinyx[i] + "px";
} else {
tiny[i].style.visibility = "hidden";
tinyv[i] = 0;
return;
}
} else tiny[i].style.visibility = "hidden";
}
document.onmousemove = mouse;
function mouse(e) {
set_scroll();
y = (e) ? e.pageY : event.y + sdown;
x = (e) ? e.pageX : event.x + sleft;
}
function set_scroll() {
if (typeof (self.pageYOffset) == "number") {
sdown = self.pageYOffset;
sleft = self.pageXOffset;
} else if (document.body.scrollTop || document.body.scrollLeft) {
sdown = document.body.scrollTop;
sleft = document.body.scrollLeft;
} else if (document.documentElement && (document.documentElement.scrollTop || document.documentElement.scrollLeft)) {
sleft = document.documentElement.scrollLeft;
sdown = document.documentElement.scrollTop;
} else {
sdown = 0;
sleft = 0;
}
}
window.onresize = set_width;
function set_width() {
if (typeof (self.innerWidth) == "number") {
swide = self.innerWidth;
shigh = self.innerHeight;
} else if (document.documentElement && document.documentElement.clientWidth) {
swide = document.documentElement.clientWidth;
shigh = document.documentElement.clientHeight;
} else if (document.body.clientWidth) {
swide = document.body.clientWidth;
shigh = document.body.clientHeight;
}
}
function createDiv(height, width) {
var div = document.createElement("div");
div.style.position = "absolute";
div.style.height = height + "px";
div.style.width = width + "px";
div.style.overflow = "hidden";
div.style.backgroundColor = colour;
return (div);
}
// ]]>
</script>
And now click Save
# you can change :
var colour="black";
Snow Effect for Blogger Blogs! Make snow fall from your blog!

<script type="text/javascript" src="http://24work-new.googlecode.com/svn/trunk/24work-blogspot/snow-cursor/snowstorm.js"></script><a href="http://24work.blogspot.com/" target="_blank" title="Blogger Tips and Tricks"><img src="https://bitly.com/24workpng1" alt="Blogger Tips and Tricks" border="0" style="position: fixed; bottom: 10%; left: 0%;" ></a>
Snow Falling Christmas Snow on your Blogs!

<script type="text/javascript" src="http://24work-new.googlecode.com/svn/trunk/24work-blogspot/snow-cursor/snow.js"></script><a href="http://24work.blogspot.com/" target="_blank" title="Blogger Tips and Tricks"><img src="https://bitly.com/24workpng1" alt="Blogger Tips and Tricks" border="0" style="position: fixed; bottom: 10%; left: 0%;" ></a>
That’s All!
Hope you have enjoyed the post.
Comments
Post a Comment