
Show- hide, Smooth sliding and sexy. Menu bar with javascript and mootools. This post explains how to add Sexy Sliding JavaScript Side Bar Menu Using Mootools Widget on his blog that looks good on your blogspot blog.Be effective CSS vertical menu with show / hide uses MooTools to show / hide the menu with a vertical slide-in/slide-out nice effect.
About MooTools: "MooTools is a compact, modular, Object-Oriented JavaScript framework designed for intermediate to advanced JavaScript developer. It lets you write powerful, flexible, cross-browser code with its elegant API, well documented and consistent. ".
MooTools Home: Home Mootools.
How to Install Beautiful Sliding JavaScript Side Bar Menu Using Mootools
Now let's start adding it...
Step 1. Login to Your Blogger Account.Go to your Blogger Dashboard.Click on Layout tab from left pane and click on Add a Gadget link.
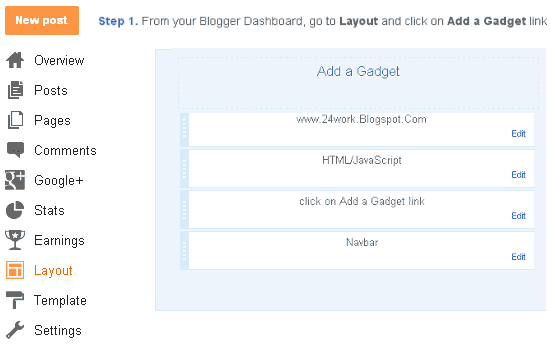
Step 2. After click on Add a Gadget link A pop-up box will open now
with many gadget list, Choose HTML/JavaScript from the gadget options by clicking the blue plus sign for that gadget.
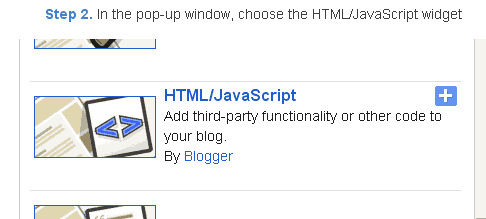
Step 3. Select 'HTML/Javascript' and add the one of code given below.
Step 4. Now Click On Save 'JavaScript' You are done. ..............
<script src="http://24work-new.googlecode.com/svn/trunk/24work-blogspot/side-bar-menu/prototype.js" type="text/javascript"></script>
<script src="http://24work-new.googlecode.com/svn/trunk/24work-blogspot/side-bar-menu/effects.js" type="text/javascript"></script>
<script src="http://24work-new.googlecode.com/svn/trunk/24work-blogspot/side-bar-menu/side-bar.js" type="text/javascript"></script>
<a href="http://24work.blogspot.com/" target="_blank" title="Blogger Tips and Tricks"><img src="https://bitly.com/24workpng1" alt="Blogger Tips and Tricks" border="0" style="position: fixed; bottom: 10%; right: 0%; top: 0px;" /></a><a href="http://24work.blogspot.com/" target="_blank" title="Latest Tips And Tricks"><img src="https://bitly.com/24workpng1" alt="Latest Tips And Tricks" border="0" style="position: fixed; bottom: 10%; right: 0%;" /></a><a href="http://24work.blogspot.com/" target="_blank" title="Blogger Tricks"><img src="https://bitly.com/24workpng1" alt="Blogger Tricks" border="0" style="position: fixed; bottom: 10%; left: 0%;" /></a>
<style>
body{
font-size:75%;
}
a{
outline: none;
}
a:active{
outline: none;
}
#sideBar{
text-align:left;
}
#sideBar h2{
color:#F0FFFF;
font-size:110%;
font-family:arial;
margin:10px 10px 10px 10px;
font-weight:bold !important;
}
#sideBar h2 span{
font-size:125%;
font-weight:normal !important;
}
#sideBar ul{
margin:0px 0px 0px 0px;
padding:0px 0px 0px 0px;
}
#sideBar li{
margin:0px 5px 5px 10px;
padding: 0 0 0 10px;
list-style-type:none;
display:block;
background-color:#DA1074;
width:177px;
color:#FFFFFF;
}
#sideBar li a{
width:100%;
}
#sideBar li a:link,
#sideBar li a:visited{
color:#FFFFFF;
font-family:verdana;
font-size:100%;
text-decoration:none;
display:block;
margin:0px 0px 0px 0px;
padding:0 0 0 20px;
width:100%;
}
#sideBar li a:hover{
color:#FFFF00;
text-decoration:underline;
}
#sideBar{
position: fixed;
width: auto;
height: auto;
top: 140px;
left:0px;
background-image:url(https://blogger.googleusercontent.com/img/b/R29vZ2xl/AVvXsEjeqm-xdHQo5NLjzKMOJjYB7s0-NaeiZ5CNTX8kTBOo-ag0AMqF2WH0CVIKwvqCinefVzEpkBXZwt85NnPLSHfKC5I-Rt6oHyN5ZwUvQfIDuf9Gn-bbkDhFcSEj8AbuZTz7jy2PHvdKgA5B/s320/left.collapse.border.png);
background-position:top right;
background-repeat:repeat-y;
}
#sideBarTab{
float:left;
height:137px;
width:28px;
}
#sideBarTab img{
border:0px solid #FFFFFF;
}
#sideBarContents{
float:left;
overflow:hidden !important;
width:200px;
height:320px;
}
#sideBarContentsInner{
width:200px;
}</style>
<div id="sideBar">
<div id="sideBarContents" style="display:none;">
<div id="sideBarContentsInner">
<h2>Left<span>Menu</span></h2>
<ul>
<li><a href="#">Link One</a></li>
<li><a href="#">Link Two</a></li>
<li><a href="#">Link Three</a></li>
<li><a href="#">Link Four</a></li>
</ul>
</div> </div>
<a id="sideBarTab" href="#"><img alt="sideBar" src="https://blogger.googleusercontent.com/img/b/R29vZ2xl/AVvXsEhmwmnRxQYPP5C7lVQf5JF-Ev6I46-BaOu-DKeFsbuQWxIRAPalk9L-uaXBOac1FmRMeJErTs2ZLzok9CL1JkZTwF4qxNvc1RH7VpEuMfOulpJYJzMQbGvAQaNy4YGYe473x8rhbsM-tQrX/s320/sidebarcollapse.png" title="sideBar" /></a>
</div>
<script src="http://24work-new.googlecode.com/svn/trunk/24work-blogspot/side-bar-menu/effects.js" type="text/javascript"></script>
<script src="http://24work-new.googlecode.com/svn/trunk/24work-blogspot/side-bar-menu/side-bar.js" type="text/javascript"></script>
<a href="http://24work.blogspot.com/" target="_blank" title="Blogger Tips and Tricks"><img src="https://bitly.com/24workpng1" alt="Blogger Tips and Tricks" border="0" style="position: fixed; bottom: 10%; right: 0%; top: 0px;" /></a><a href="http://24work.blogspot.com/" target="_blank" title="Latest Tips And Tricks"><img src="https://bitly.com/24workpng1" alt="Latest Tips And Tricks" border="0" style="position: fixed; bottom: 10%; right: 0%;" /></a><a href="http://24work.blogspot.com/" target="_blank" title="Blogger Tricks"><img src="https://bitly.com/24workpng1" alt="Blogger Tricks" border="0" style="position: fixed; bottom: 10%; left: 0%;" /></a>
<style>
body{
font-size:75%;
}
a{
outline: none;
}
a:active{
outline: none;
}
#sideBar{
text-align:left;
}
#sideBar h2{
color:#F0FFFF;
font-size:110%;
font-family:arial;
margin:10px 10px 10px 10px;
font-weight:bold !important;
}
#sideBar h2 span{
font-size:125%;
font-weight:normal !important;
}
#sideBar ul{
margin:0px 0px 0px 0px;
padding:0px 0px 0px 0px;
}
#sideBar li{
margin:0px 5px 5px 10px;
padding: 0 0 0 10px;
list-style-type:none;
display:block;
background-color:#DA1074;
width:177px;
color:#FFFFFF;
}
#sideBar li a{
width:100%;
}
#sideBar li a:link,
#sideBar li a:visited{
color:#FFFFFF;
font-family:verdana;
font-size:100%;
text-decoration:none;
display:block;
margin:0px 0px 0px 0px;
padding:0 0 0 20px;
width:100%;
}
#sideBar li a:hover{
color:#FFFF00;
text-decoration:underline;
}
#sideBar{
position: fixed;
width: auto;
height: auto;
top: 140px;
left:0px;
background-image:url(https://blogger.googleusercontent.com/img/b/R29vZ2xl/AVvXsEjeqm-xdHQo5NLjzKMOJjYB7s0-NaeiZ5CNTX8kTBOo-ag0AMqF2WH0CVIKwvqCinefVzEpkBXZwt85NnPLSHfKC5I-Rt6oHyN5ZwUvQfIDuf9Gn-bbkDhFcSEj8AbuZTz7jy2PHvdKgA5B/s320/left.collapse.border.png);
background-position:top right;
background-repeat:repeat-y;
}
#sideBarTab{
float:left;
height:137px;
width:28px;
}
#sideBarTab img{
border:0px solid #FFFFFF;
}
#sideBarContents{
float:left;
overflow:hidden !important;
width:200px;
height:320px;
}
#sideBarContentsInner{
width:200px;
}</style>
<div id="sideBar">
<div id="sideBarContents" style="display:none;">
<div id="sideBarContentsInner">
<h2>Left<span>Menu</span></h2>
<ul>
<li><a href="#">Link One</a></li>
<li><a href="#">Link Two</a></li>
<li><a href="#">Link Three</a></li>
<li><a href="#">Link Four</a></li>
</ul>
</div> </div>
<a id="sideBarTab" href="#"><img alt="sideBar" src="https://blogger.googleusercontent.com/img/b/R29vZ2xl/AVvXsEhmwmnRxQYPP5C7lVQf5JF-Ev6I46-BaOu-DKeFsbuQWxIRAPalk9L-uaXBOac1FmRMeJErTs2ZLzok9CL1JkZTwF4qxNvc1RH7VpEuMfOulpJYJzMQbGvAQaNy4YGYe473x8rhbsM-tQrX/s320/sidebarcollapse.png" title="sideBar" /></a>
</div>
And now click Save
Note: Keep in mind that before a save above "#" of land and your link Link One, Link Two, Link Three Link Four, and the name of the place you need to do is save.And here is the link I used to have 4, you can link up to 10
Comments
Post a Comment